Lesson 1:
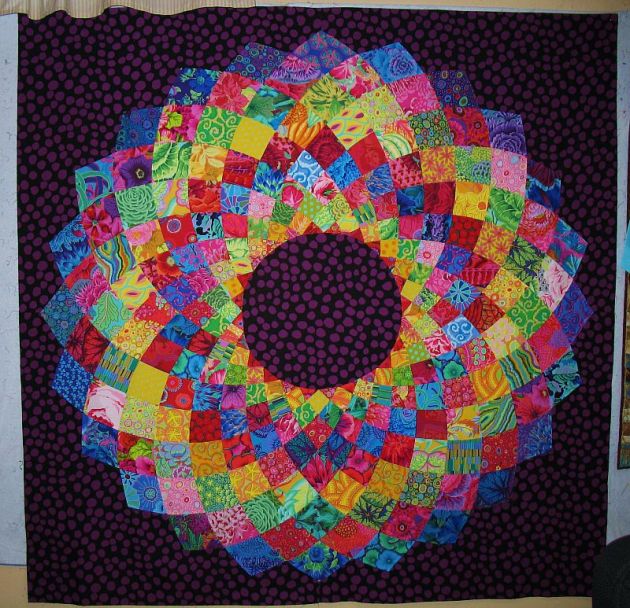
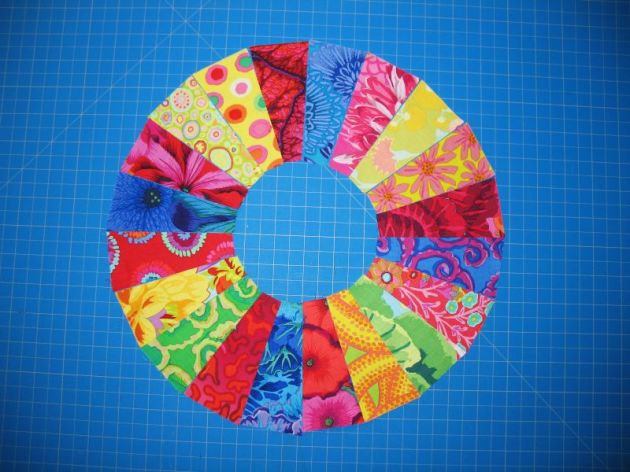
The Giant Dahlia will be a 56 inch circle and have a 15 inch circle in the middle. I’ll be appliqueing the center circle of mine then appliqueing it onto a larger background. We’ll get to that part a little later after the Dahlia construction is done!
Download the free pattern here!
Click to access di9i4akhlas2d040v8x7.pdf
Tools you need to make this are very simple. You can machine sew or hand sew. You will need an Elmer’s or generic washable gluestick and a toothpick or the pointy end of a bamboo skewer, a pressing board and iron. No pins needed! I’m going to share my method of taming curves and taking the scary part out of piecing them.
Alrighty! let’s get started! print out just one set of the templates and cut them out making sure you don’t cut off the included seam allowance. All you need is the 10 (or 11) templates. You can follow the color scheme above or use scraps or batiks or whatever you’d like. I chose to use a red/yellow/green/pink/blue color scheme and repeated it twice. Each arc has 10 fabrics in it. You can choose to make each template a different graded color scheme if you’d like. So, using your templates, you will cut the following and I’m going to follow my color scheme above just for example:
#1- cut 24 different reds-approximately 1 fat quarter
#2-cut 24 different yellows-approximately 1 fat quarter
#3-cut 24 different greens-approximately 1 fat quarter
#4-cut 24 different pinks-approximately 1.5 fat quarters
#5-cut 24 different blues-approximately 1.5 fat quarters
#6-cut 24 different reds-approximately 1.5 fat quarters
#7-cut 24 different yellows-approximately 2 fat quarters
#8-cut 24 different greens-approximately 2 fat quarters
#9-cut 24 different pinks-approximately 2 fat quarters
#10-cut 24 different blues-approximately 2 fat quarters
Optional piece #11-cut 24-approximately 3 to 4 fat quarters needed.
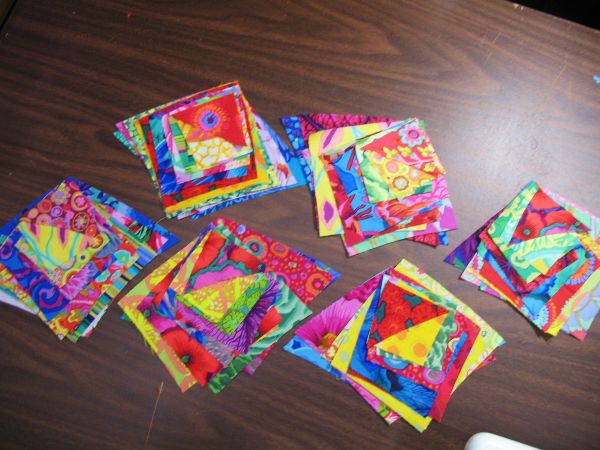
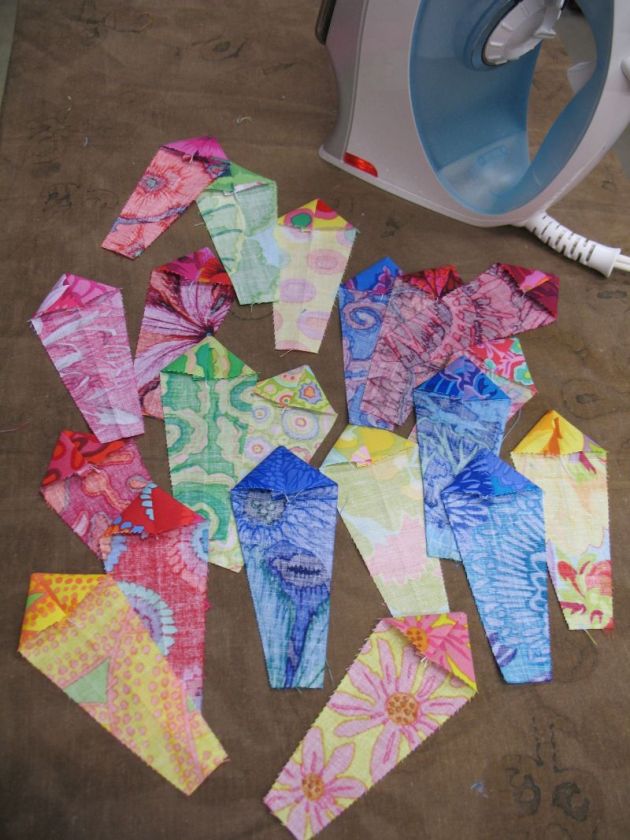
Now, if you like to add the #11 piece, it will make the edge of your dahlia a smooth circle. If you leave it off as I did, you’ll have a pointed edge circle. I plan on appliqueing the pointed edges to a background. Once you have all of your template patches cut, leave them in their stacks in a row from 1-10. Make sure you don’t get any of the numbering turned around or out of order. Starting with #1 which is the small triangle, take one piece from each stack 1-10 starting with #1 on the top and ending up with #11 on the bottom of the stack. That is one complete arc already set up for sewing. Continue to make the stacks for the remaining 23 arcs.
You should have 24 stacks that look like this.
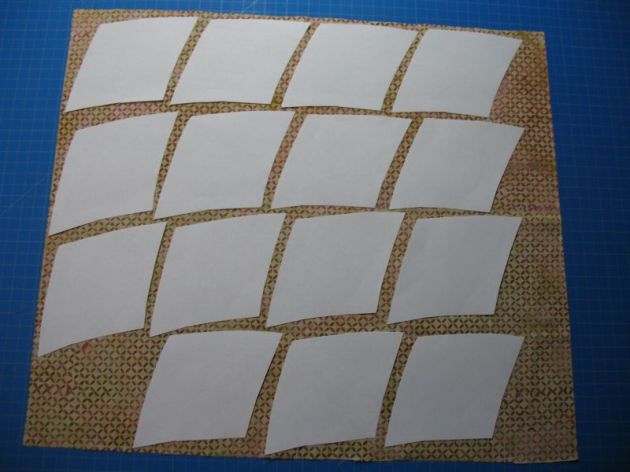
I’ve been asked about fabric requirements. I used scraps for mine so coming up with yardage needed was a little tricky. I took the largest piece to see how many pieces could be cut from 1 fat quarter and I got 15 pieces from 1 fq. I’m estimating 2 fat quarters needed. I’ve also edited the cutting directions to reflect the yardage needed for each template. This is the largest piece of the arc #10 laid out on a fat quarter to show placement.
This first video covers making your arc stacks and sewing the arc together
This is the next video for this project. I’ll show how I press the outer arc seems under 1/4 inch and how I use the gluestick to secure the seams before stitching.
_____________________________________________________________________
Lesson 2: Center Circle Dresden Plate and Background
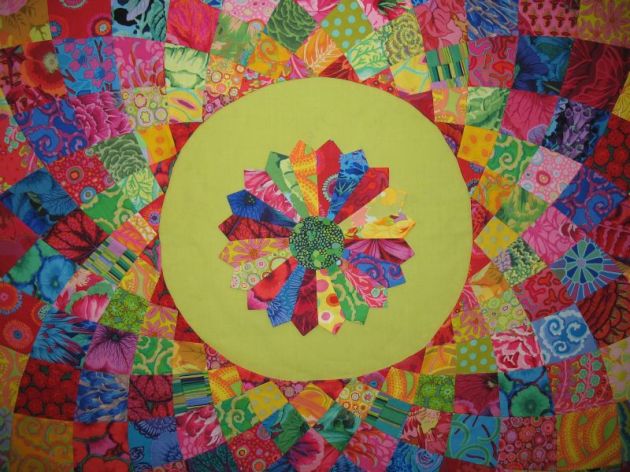
Hello again! I hope that everyone is having fun creating your Giant Dahlia. Tonight I’m going to talk about creating your center. Now, there are many ways you can create your center. About as many ways as a person can dream up. You can choose a floral applique such as a Rose of Sharon applique pattern or a pieced center such as a paper pieced star. However you want to finish your center is entirely up to you. I like to leave a part of the project open for your interpretation so you can make your quilt uniquely YOU. The option I’m going to show you is the Dresden Plate with Blades. I originally printed my templates out for a 10 inch block but I’m not entirely satisfied with the dimension in which the plate turned out once I put it in the center of my Giant Dahlia. It’s too small. The templates I’m providing are for the 5 Bladed Dresden Plate block in EQ7 sized at 13 inches. I think that size will balance much better in the center. I’m using a picture tutorial tonight rather than the video camera. We’ve got some storms rolling in and it’s rather gloomy in this basement studio without the natural light of the sun. So, let’s go!
*Note* I use a design wall to do my designing and construction. It’s basically a flannel backed tablecloth with the backside out. I have it taped to my wall with double sticky tape since my walls are good old concrete. Fabric sticks to that flannel backing so good! Since I’m dealing with circles, I like to look at the project vertically to be sure that my circle edges are accurate. I have a hard time judging that if the project is laid on a table.
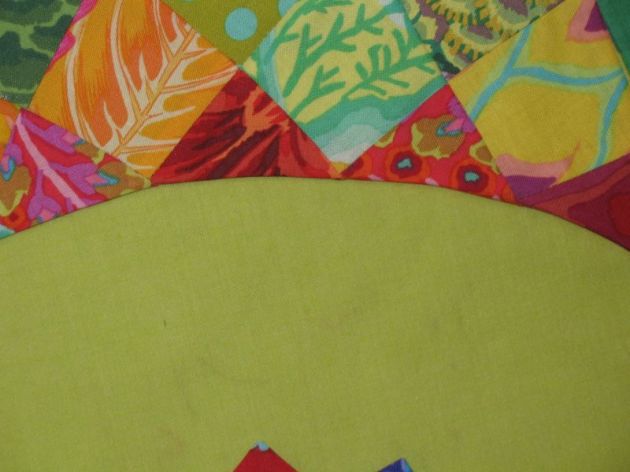
I chose a Kaffe Fassett shot cotton in Green Apple for my background fabric. I cut an 18 inch square and placed it behind the Giant Dahlia.
There will be enough excess behind it so that I can safely handle the project for stitching. I like to cut the center a little bit bigger to start with then trim down any excess after I have the center safely stitched and secured. I’ve said too many bad words by cutting it too small and then having to deal with it misbehaving.
The next step will be to turn under the edge of the inner circle and press that edge well. Make sure the points of the first yellow diamond in the arc meet the edge crisply so you don’t lose any of those pretty points.
Take a good look at your circle and make any adjustments needed for a balanced symmetrical circle. You can safely adjust the edge now without compromising your dahlia shape. It’s easy to work those bigger adjustments in later if your dahlia doesn’t seem to lay quite flat. You have lots of bias edges in the dahlia that will work to your advantage later while making adjustments.
Now, it’s time for that awsome gluestick again! Using the dabs of glue just like you did for the arcs, put dabs of glue between the turned under edge and the background every 1/4 inch and press well with your fingers to make sure you have a good bond. Once you have your edges glued under well and the glue has dried, you can hand applique the edge to the background or machine stitch it.
Next we’ll make the Dresden Plate. You can find the templates here:
https://mojoquiltdesigns.box.com/s/eidc1slwrq7thgzl2itg
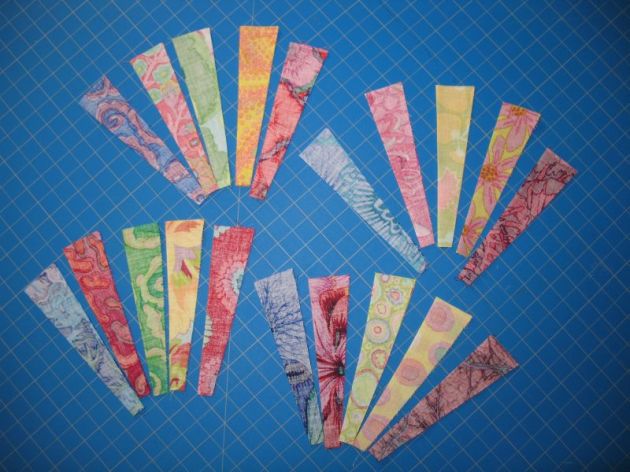
This dresden has 20 blades. I used my original color scheme of blue/pink/green/yellow/red to cut my blades. I cut 4 blades for each of the 5 colors.
Since these blades will have a pointed edge, we’ll need to create that point, but first some prep work!
Fold all the blades vertically in half with the rightside of the fabric IN. You want the back of the fabric on the outside, and press them. You want a good press line for the next step.
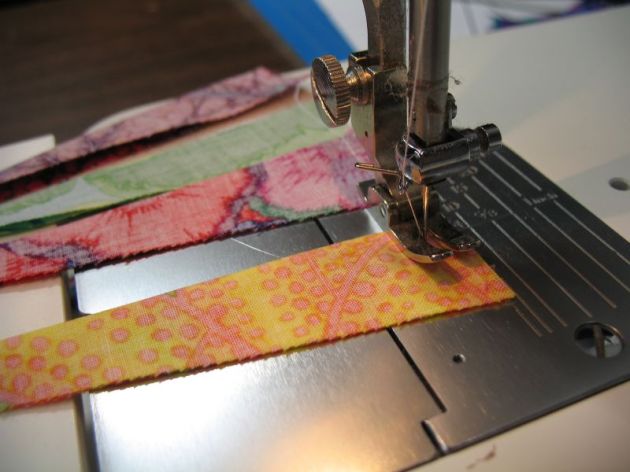
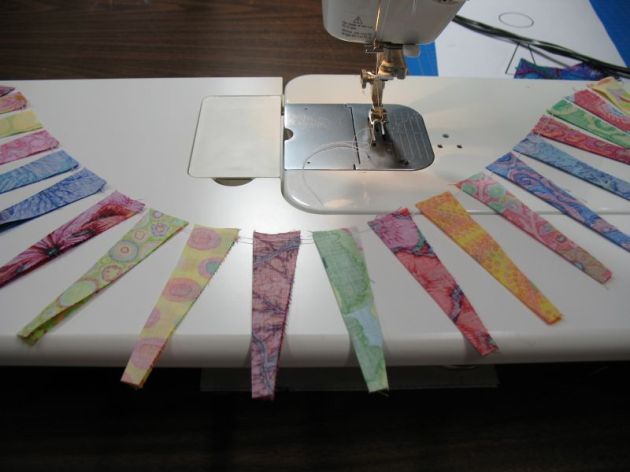
Now, you will need to sew along the top wider edge which will create the point of the blade. I chain sew my blades together because it’s faster. I put the folded edge under the presser foot first to prevent the edge being stitched from getting gobbled up by those hungry feed dogs.
And now we have a really cool blade chain! snip the stitches between them.
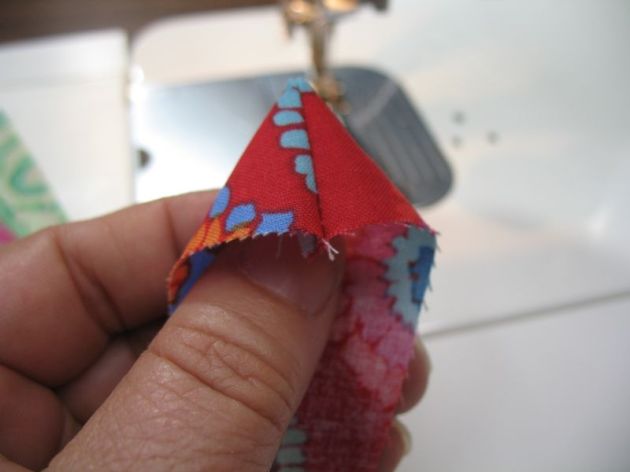
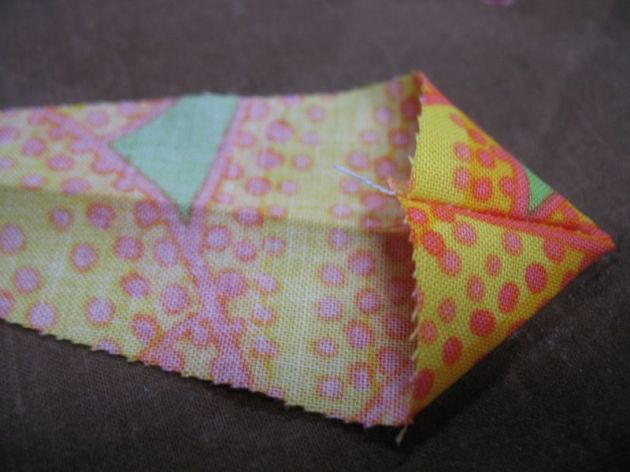
It’s time to make a point! hey, I’m trying to make a point here! let’s make a point 🙂 You’ll now use that vertically pressed fold line you did earlier as a guide to make sure your points are turned out evenly. Put your finger inside the blade and turn the point rightside out. Use a toothpick or the end of a bamboo skewer to push the point out from the inside but make sure it’s not too sharp or it could puncture the fabric. Make your points as crisp as you can get them.
Once, you have all your points turned to the rightside, you’ll need to press them down. Use the vertically pressed crease you made earlier to help you line up the seam with the creaseline and your blade should be perfect.
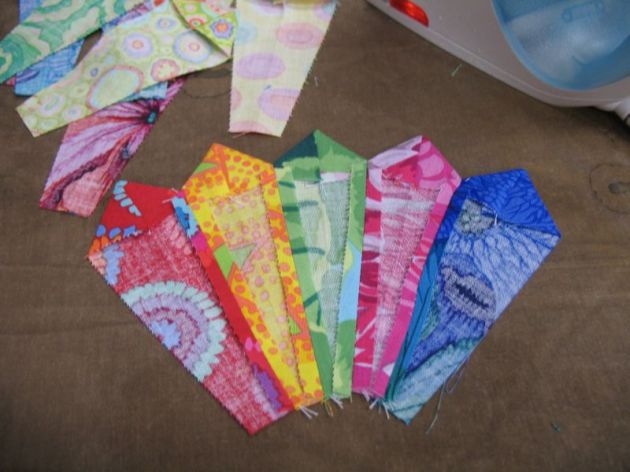
here are the blades all ready to be sewn into a beautiful Dresden Plate.
I like to sew my plates in 4 sections. It’s easier to press those little seams. I then join the 4 sections together to form the plate. Press the seams either to one side or open according to your preference.
Join all 4 sections to make the dresden plate and press. I should say right now that what I personally do is probably closer to ‘uber” pressing which basically means that if it’s not laying quite flat enough for me, I starch the crap out of it until it behaves 🙂 Starch is my friend.
Next you’ll make your center for your dresden plate. The circle provided in the template is perfectly sized but you can now choose to make that center circle any size you want. If you want a bigger circle, just hunt through your cabinets or pantry for a jar or can that you like. I have made applique circles a couple different ways. I have drawn the circle on the back side of my chosen fabric and put the fabric rightsides together with a piece of light interfacing and sewn right on my drawn line, sewing the entire circle closed. Make a snip in the interfacing just big enough to turn the circle rightside out and press well. You’ll have a circle with a finished edge ready to either hand applique or machine stitch to the middle of your dresden plate. You can also trace your circle shape into a stiffer paper or cardboard and press the edges of your circle to the back of the cardboard to make a finished edge. There are many ways to finish your circle so however you prefer will be awsome!
Place your dresden plate in the center of your background circle and adjust to make sure it is centered. You can glue it down with the gluestick or use pins to secure it while you hand applique or machine stitch the pointed edges down.
This picture is when I realized that the 10 inch dresden plate I made was just a little too small for the background center. It looks a little wimpy in there. The 13 inch plate templates provided will make a larger, more balanced plate for the center.
That’s it! once you have your dahlia edge stitched and secured and your plate stitched and secured, you will be ready for the next big lesson! That will be applying your Giant Dahlia to a large background square and then you’ll be a huge step closer to enjoying your own unique Giant Dahlia quilt!
~~~~~~~~~~~~~~~~~~~~~~~~~~~~~~~~~~~~~~~~~~
**NEW** Background Instructions 7/6/2013
Now that you have your Giant Dahlia sewn and the center sewn, it’s time to apply it to a background. For my GD, I chose to make a 60 inch square background. You can make yours bigger if you’d like, but I’m going to give instructions for the 60 inch measurement for teaching purposes. At this point I’m going to give beginner/intermediate level instructions. You’ll be appliqueing your GD onto the background fabric square and once you have that process complete, you can choose to cut away the excess background fabric behind your Giant Dahlia or you can choose to leave it intact. That’s a personal choice I will leave up to you. Quilting fabric is sold in 44/45 inch widths. Due to that width, you will need:
3 and a half yards of background fabric. From that you will cut:
Four 30.5 inch squares
To jazz up your background, you could choose 4 different fabrics for your background. They don’t have to be the same fabric if you have some pretty fabrics you’d like to showcase.
Sew your four squares together in a giant 4 patch.
The vertical and horizontal seams created will also serve as markers to help center your GD on the background. I don’t have sufficient floor space or table space big enough to spread my background out on the floor so I have to get my GD centered and adjusted vertically on my design wall. The following instructions apply whether you do this step vertically or horizontally.
**Refer to the picture posted below for the following instructions**
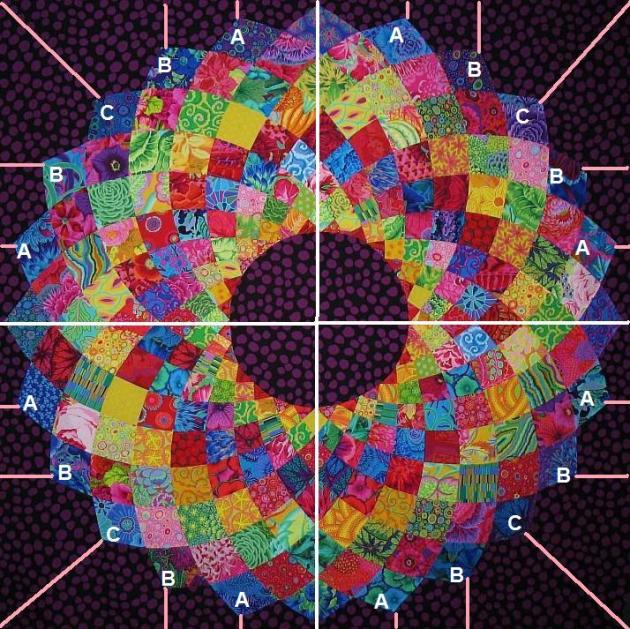
Look at your GD. You will see that it is made up of 4 sections. I centered mine by placing the point of the outermost dahlia piece vertically at the top, bottom, and sides. These sections are designated by the white lines in the picture example. The GD measures 56 inches wide at those points so I know that I should have at least 2 inches between the point and the edge of the background fabric. If you make your background larger, you will have a greater measurement. Once you have those 4 points pinned and secured and the center of the GD center is lining up with the background seams’ center intersection, you are ready to start doing a LOT of measuring :). This step can be a little tedious, but the attention to detail will pay off with a perfectly centered Dahlia.
I’ve broken the picture up into 4 sections denoted by the white lines. Since this is a symmetrical pattern, every point in each section should have the same measurement. You will need a notepad and pencil to keep track of your measurements.
You now have the top, bottom and side points of the GD pinned. Smooth your dahlia out as much as possible, making sure that it lays flat on the background square without distorting it. Look at the example picture. See where I have put the pink lines from the point of the dahlia to the edge of the background? those are the measurement points that need to be the same in all 4 sections. All the A’s need to have the same measurement from the dahlia point to the edge of the background fabric, and so on with all the B’s, and the C’s. Don’t be afraid to smooth and gently tug a point to where you want it to be. There are a lot of curved seams in the dahlia and they can be adjusted fairly easily. Once you have all of the points adjusted and pinned, you can do as I did and use the gluestick once again to glue the edges of the dahlia down. I glued every single edge of my dahlia down so nothing would shift during the handling of it while I appliqued the edges down. Just get it as secured as you can and then either handstitch or machine stitch the edges of the dahlia to the background. This step is all about the measuring, I can’t stress that enough. Go slow and make sure you have your dahlia exactly where you want it to be and secured down before you pick up the entire quilt top or move it.
At this point you can add multiple borders, appliques, and just about anything your heart desires to personalize your Giant Dahlia and make it your own. Thank you for following along and I sincerely hope that you have had fun learning my method for creating a Giant Dahlia quilt!
Background Instructions


Tylea said:
Nice pattern, going to give it a try
Judy U said:
When is the next lesson?
quiltgirl40 said:
Thank You! Always wanted to make one of these!
mojoquiltdesigns said:
I just got back from taking a 13 yr old clothes shopping 🙂 I’ll post the arc construction tonight after I recover!
Irene said:
Thank You, this is an amazing design and tutorial. Take it easy… 😉
Brandy M. said:
I love it! I’ve NEVER been interested in hand work, at all, but I’m thinking of setting this all up to take on a road trip in a couple of weeks…
Thanks so much for doing this!
mojoquiltdesigns said:
That is an awsome idea Brandy! once you get your arc stacks made you could pop it into a ziplock bag and take it with you!
Marion vanS said:
I seem to be able to only locate cutting instructions and templates. Where do I go to get the rest of the sewing instructions?
Kim Galley said:
This is my problem too. The video isn’t available.
Lo Bjorksten said:
I’m also wondering where I find the sewing instructions please? I’ve printed off the templates but don’t know what to do next 🙂
Lori Pearson said:
Lo, do you happen to still have the templates? The link no longer works here! 😦
mojoquiltdesigns said:
Lo, the next step is to decide on your fabric choices and using the templates, cut the pieces out so your arc stacks are ready to sew. We haven’t gotten to the sewing part yet.
Marian Vollans said:
About how much fabric do we need?
Sandi Grove said:
Great pattern will give it a go but … How much fabric do we need?
mojoquiltdesigns said:
I updated the estimated yardage needed! please read through the cutting instructions for the info! thanks!
Sandi Grove said:
Great thanks!
mojoquiltdesigns said:
Tornado weather last night set me back a little bit in getting the arc construction pics and instructions loaded. I’ll get that done tonight unless more tornado weather arrives this evening which it’s supposed to 🙂 gotta love Kansas weather!
Susan M Sayers said:
Hope you and yours are safe.
Rita McCart said:
Thank you for the pattern, just waiting on a confirmation email. 🙂
mojoquiltdesigns said:
Rita, did you get a message saying that you were to get an email confirmation? it shouldn’t be doing that
mojoquiltdesigns said:
Woohoo! I’ve got the camera up and running! very soon we’ll have video tutorials!
Rosemary Allen said:
Can you tell me approximately how long the template is for the dresden plate insert. I want to make sure my printer printed it in the right size.
Rosemary Allen said:
When you get a chance, let me know how long the template is for the dresden plate.
Sandy Holmes said:
I love it; thanks so much for sharing the pattern and your talent too.
Shirley Rae said:
efficient and easily understood …… NO thank YOU!
Peggy Mislock said:
Very easy, thank you. I have a quick question on finishing. Did you machine stitch the edge, line it with another fabric? Just curious.
mojoquiltdesigns said:
I’m working on printing a template for the edge and instructions for appliqueing the entire dahlia on to a 60 inch square. You can machine stitch the edge or hand stitch or, if the template is successful, you’ll be able to cut the 4 pieces needed to piece it.
berneida said:
Are the template’s still available does anyone still have them I would appreciate it email me at betneidacash@gmail.com thanks ahead of time love this pattern
hmc56 said:
Oh my Sondra!!
How awesome!!
Thank you!!
I could sit here and listen to your instructions all day!!! You have a wonderful voice and very cute accent!!!
You make everything look so easy that I think even I could make this!!!
Thank you for all the new and wonderful tips and instructions 🙂
Hmarie (Heather)
Sandi Schadt said:
I love this. I am going to make this in batiks. Great video instructions. Thanks for sharing.
Nancy said:
AMAZING …. LOVE IT …. will attempt this one day …. great tutorial …
Patty Ryker said:
My, you do have a great deal of patience but it so pays off. I will probably do a couple of practice pieces first. This is a wonderful tutorial, thank you so much.
Rosemary Allen said:
I am planning to make this dahlia, but I still have a question regarding the dresden plate in the center of the circle. You indicated to me that the template measures 5.5 inches vertically down the middle from the edge of the top seam allowance to the bottom seam allowance. However, when I print it out to “actual size” on the printer it only measures about 5 inches. So now I am worried that the dahlia templates might also not be the correct size. For example, the dahlia pattern no.10 when printed is measuring about 6 3/4 vertically (its longest two points) and pattern no.11 is 7 1/4. Are these the correct sizes?
mojoquiltdesigns said:
are you clicking “fit to page” when printing?
Rosemary Allen said:
It seems to be printing the correct size now. I don’t know what I did. Thanks for responding to my questions.
Rhonda Bailey said:
am also worried that my pieces aren’t printing the correct size; however, I don’t have an option to print “fit to page”. My piece #11 is 7 inches vertically including seam allowances. My Dresden Plate piece is 5 1/4 with seam allowances. Are these the correct sizes
Thank you!
Nadine said:
Hello, I’m from Luxembourg and I planted a Summer-Quilt- Workshop every summer. My moto this Year is a Dahlia and some of my Students will make your Dahlia. Thanks for this great pattern and I will send you pictures, after the Summerworkshop.
mojoquiltdesigns said:
wonderful! I will be posting the background instructions soon!
Patricia Faye said:
Love the Dahlia Quilt & am definitely going to make one for myself. Your tutorial is very easy to follow. Thank you for providing the free tutorial & templates!
Pingback: The Final Giant Dahlia Lesson~Background Instructions! | Mojo Quilt Designs
Karen Koschke said:
Thanks Sondra, had this in my plans but your directions made it so much easier. I’m using Christmas fabrics and making just the GD itself as a tree skirt. It’s looking great.
Sondra Millard said:
Wonderful! I would love to see pictures!
Tina said:
I’m so excited to see this! I made a giant dahlia as a wedding gift in 1991, when I was just learning to quilt. The center looked like a volcano! After a nip and a tuck, I quilted it out. It might be time for me to try it again!
Michelle said:
Stunning- and you are so kind to share! I am making one for sure.
Penny said:
wow ! i love how detailed your instructions are , it sure makes it easier to understand how you do the steps
Margaret wilson said:
Love it I’m going to give it a go xxx
glenda medley said:
love your machine embroidy.
I make quilts.this would work great on them
.
Daynora Clements-Caul said:
This is so outstanding!
Teri Reymann said:
Thank you for sharing this with us!! It is definitely on my to-do list! I’m actually thinking a take along hand pieced project!!
Vonnie said:
If you’ve done office parties or corporate work, make sure to mention that as well.
“Arsenio was a big hit way back when, he exited prematurely, and aren’t
we all just plain tired with Jay Leno and Letterman. Wouldn’t it be nice if we could take a magic pill and have a
perfect relationship.
Debbie said:
Thank you so much for designing and sharing this project with us. Your design and instructions are awesome.
glenda medley said:
thank you for this pattern,, I have wanted this pattern for a very long time.
Dianne Walker said:
I think this will be a great pattern for my hand dyed fabric!
Eleanor said:
My mom and I (she is the one who sews some but does not quilt) want to try to make this for a fundraiser at school using the dads’ old ties. We would like to know how to cut the fabric – or if it even matters. Considering the ties are cut on the bias, where is the straight of the grain on the pattern pieces? I hope you see this. Thank you.
Kathryn said:
Thank you so much for your informative tutorial; after reading this I am encouraged to give it a try! Excellent help.
rsroesner said:
Thanks so much for taking the time to do this. Your video and your instructions are SO clear and helpful. Now, back to my own drawing board, with a bucket full of new techniques, thanks to you!
Angie T said:
I’m a bit late to the party, but this is so cool. I’m getting ready to tackle this pattern for the first time. I’m just tickled to see your beautiful quilt with all the instructions and tips you share. Can’t wait to get started. Thank you so much for your generosity.
Donna said:
I saw another version of this on Pinterest all done in purples Are the fabric requirements the same for that version
Elisse Neuenschwander said:
I think this Dahlia quilt is so beautiful, I want to make it, but when you cut your fabric from the templates do you just use scissors, not a rotary cutter?
Nilda said:
Lovely pattern. Want to do it.
Pingback: In the beginning | honeycombhideoutblog
Mari J said:
I would like to make a dahlia quilt 48″ in diameter. How would I adjust the templates? Thank you
Laura Crawford said:
Thank you for your guidelines! I am diving in to make a Giant Dahlia quilt for my granddaughter over the next few years…. With your helpful video and Marti Mitchell’s template set, I am starting to get my courage up. Now to select the fabric.
Sue Craighead said:
I cannot print the instructions. I click on the print button but nothing happens. Is there a secret password? 😉
Sue Ring said:
I couldn’t get it to print either, so I copied and pasted it into a word document which I was then able to print. Templates can be printed from the link at the very beginning of the instructions.
Thank you for your instructions, I can’t wait to make this.
heidi leather said:
I love this quilt. Is there anyway to make this quilt smaller so that i would be able to put a 10 or 11 inch centre circle?
Theresa Avila said:
My Dahlia will not lay down, should I add more rows???
Dana C said:
Thank you so much for this wonderful template and tutorial. I finished my first Giant Dahlia this week! It won’t be my last.
Helen Reidt said:
April 2017. I just found you excellent tutorial. I am encouraged to actually give this a try. Thanks
Charlaine Holwick said:
Always wanted to make one of these
Annie Ringuette said:
Hello,
I am working on this Giant Dahlia, I cut all my fabrics, glued them, ironed and pressed. Then when I was trying to open the instructions but its unavailable. What can I do? How can I access this instructional video? Please and thank you.
Annie Ringuette
Meredith Fehrman said:
PLEASE, I have all my pieces cut out but cannot access the video that tells me the next step. PLEASE how can I get the video?
Valerie j Hayes said:
The second video for attaching the arc, using glue then stitching is “unavailable”. Please, can you repost.
Annie Ringuette said:
The second part of the video is unavailable. I have started the dahlia but can’t go on anymore. There’s nothing in the video.
sharron stirling said:
beautiful!
sharron stirling said:
The quilt is beautiful !
d valenti said:
is there a way to watch the videos? I cannot access them
Pingback: Giant Dahlia Quilt -
Pingback: A giant Dahlia quilt – | crochetgate.club
Pingback: Giant Dahlia Quilt – Craft Free Pattern
Amy M said:
I LOVE this pattern design, so pretty. Unfortunately the link to the pattern won’t work for me (opens, but reads an error message “The pattern you are looking for can be found at http://www.shesgotmojo.com under the Free Giant Dahlia Pattern tab along the top navigation ribbon. Thank you for your interest in my tutorial!”). I’m not sure what I’m missing – any help appreciated.
Grace Smith said:
You cannot get to the template for the Giant Dahlia. The page you are lined to does not appear. Please advise.
Sasslette said:
Anyone have a copy of this pattern? It is not in the link, the PDF just says to come here. Thanks in advance.
Pingback: ►Giant Dahlia Quilt Pattern Free ( Video Tutorial ) - Decorama
Margaret Chism said:
Wonder where do I get the templates for the Giant Dahlia quilt. I read the instructions, but the videos were not available.
dbngkapjxp said:
Muchas gracias. ?Como puedo iniciar sesion?
Bobbi said:
Where are the templates for this pattern? It is not in the link which just tells us to come back here.
Godsgirl4life said:
The link for the pattern isn’t working, is there any way you could repost it? Id really like to download the pattern. Thanks so much 🙂
Kate said:
The free dahlia pattern download on your page is disabled. Is there another way to get it? Please? Tnx.
joyce privett said:
Amazing & beautiful. You do amazing work
Pingback: Giant Dahlia Quilt - Quilt For Lovers FREE PATTERN
Raelene Begay said:
I love your design! I would like to make this but I can’t find where to download the templates for the pieces numbered 1 to 11. I can’t find any cutting instructions for them either so I could use my own Dresden template. Could you help please?
spiritfilledroses said:
Hello – like the comment above, i would like to download this pattern. Is it available? Thank you in advance – i love dahlias and i love this pattern.
dwynette said:
She has a new website. Find the pattern here: https://shesgotmojo.com/?page_id=41
lifegetsinthewayofliving said:
I tried the link and got this message:
Secure Connection Failed
An error occurred during a connection to shesgotmojo.com. PR_END_OF_FILE_ERROR
The page you are trying to view cannot be shown because the authenticity of the received data could not be verified.
Please contact the website owners to inform them of this problem.
RUTHANN said:
Anxious to try
Diane C said:
It says “Download the Pattern Here” The link does not work. Can you help me?
Jax Butterworth said:
I am going to give this a go, as I have only done scrappy quilting and feel it is time to have a go at something more structured and challenging 😊
Roseanne C. Atkinson said:
The download for the pattern isn’t working. Is there another link to it???
Jacqueline V said:
Hi Sondra, I keep on getting an error message when I try to download your templates from the link at the top of this page. I just get a one page message telling me to come here, but there’s no link for the templates. I like your pattern as it has smaller pieces.
Karen Randall said:
Is the a printer friendly version of this pattern somewhere?
gina said:
Want to know where I can print out this pattern? There is no link and would really like written instructions. I just get a one page message telling me to come here, but there’s no link for the instructions
Pingback: The Wonderful Giant Dahlia Quilt - alldaycrochet
Lucretia Wright said:
Morning .. please could you send me the free pattern …. as I seem to be unable to download. Thank you
Pingback: Giant Dahlia Quilt Pattern – Crafts Patterns
Carol said:
I cant find the templates
Carmen Terranova said:
I a. having trouble downloading the Giant Dahlia free quilt patterns Please help or send it to me at cterranova59@yahoo.com Thank you